Busy Software also serves as a barcode generator and barcode printing software.
Item Bar Code Printing is an additional feature within BUSY Business Accounting Software which picks item data from BUSY (from the items already entered) or from an Excel sheet and prints Bar Codes on any Windows compatible printer. With the help of Item Bar Code Printing Add-On, you can configure Bar Code Labels/Stickers as per your requirements and print the same. Bar Codes can be printed for One Item (Multiple Copy), Group of Items and All Items.
On clicking the Item Bar Code Printing option, the program reads the dongle information. If you have purchased Item Bar Code Printing Add-On then the program will start in Licensed mode otherwise it will start in Demo mode.
Item Bar Code Printing window appears irrespective of the mode (Demo or Licensed) you are using. But if you are using a Demo mode then you will not be able to make full use of all the features. For example in the Demo mode, with the option of Print Bar Code Labels, you can print Bar Codes for first ten items only and the same Bar Codes will be printed repeatedly on repetition of Print command.
Given here is a screenshot of Item Bar Code Printing window.

Let us discuss the options given in the above screenshot in detail.
Configure Bar Code Labels
With this option you can configure the settings of Bar Code Labels/Stickers. You can create different formats by setting different configurations. The need for creating different formats can be well explained with the help of an example. ABC Limited Company deals in different types of items of different size. The company wants to put bigger labels on items contained in bigger boxes and smaller labels on items contained in smaller boxes. Hence for this purpose it can create different formats for different types of labels and can further print labels according to the selected format. Once the format is added, the next step is to set the configuration for the format.
You can add, configure, modify and delete a format by using the Select Format window. You can also read/write data from Configuration file through this window. This window appears on clicking the Configure Bar Code Labels option.
Given here is a screenshot of Select Format window.
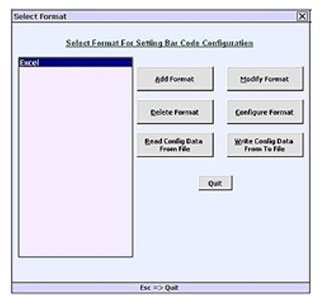
Let us discuss various buttons in the Select Format window in detail.
 Add Format
Modify Format
Delete Format
Configure Format
Read Config Data From File
Write Config Data To File
Add Format
Click this button to add a new format. On clicking this button, an Add Format sub group appears in the Select Format window in which you can specify the name for the format.
Modify Format
Click this button if you want to modify the name of a format. On clicking this button, a Modify Format sub group appears in the Select Format window in which you can change the name of the selected format.
Delete Format
Click this button if you want to delete a particular format. On clicking this button, a Delete Format message box appears asking your permission to delete the format. Click the Yes button in the message box to delete the selected format.
Configure Format
Configure Format button is used to configure a format for Bar Code printing. To use this option, select a format from the list on the left-hand side of the window and click the Configure Format button.
On clicking the Configure Format button, a Data Configure (Item Bar Code) window appears. Given here is screenshot displaying Data Configure (Item Bar Code) window.
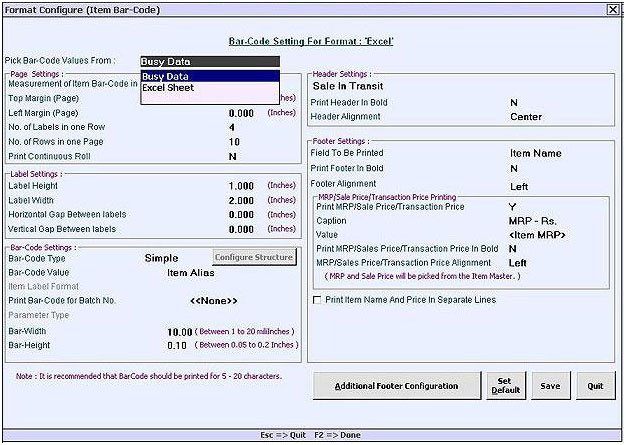
BUSY Data
If you want to pick Bar Code values from the data fed in BUSY, select the BUSY Data option from the list. On selecting the Busy Data option from the list, various fields get activated. Given here is a screenshot displaying fields that get activated after selecting Busy Data as source for picking Bar Code values.
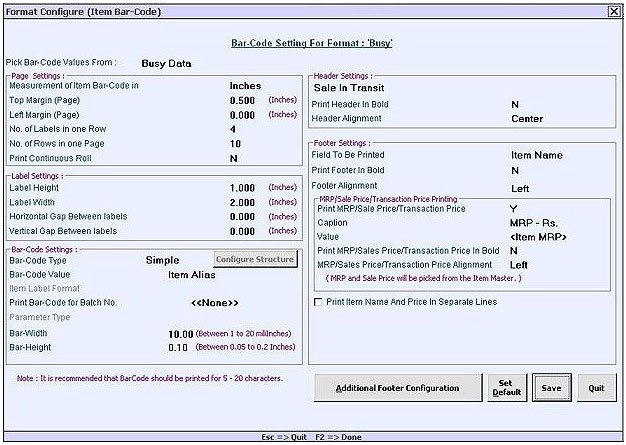
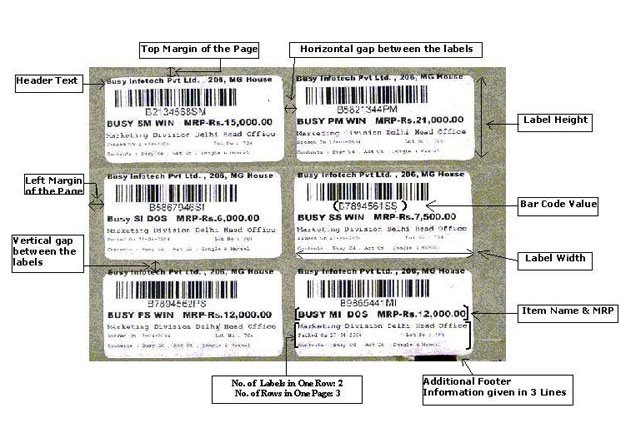
The above screenshot has been divided into five sub windows.
- Page Settings
- Label Settings
- Bar Code Settings
- Header Settings
- Footer Settings